Paper Making
For art last week, Kara helped her siblings make handmade paper. She's been teaching the older ones how to draw with ink, and they will be using this paper for some future projects.
Paper making from recycled paper is quite simple, and handmade paper makes a nice vehicle for pressed flowers, cards, or other artwork. It can be as simple or fancy as you wish.
Step 1: Tear up newsprint into little pieces. We have an end roll from a newspaper printer, and it comes in handy for all sorts of projects! You can also recycle other types of paper, but newsprint easily makes a pulp, unlike some firmer types of paper. If you want colored flecks, you can throw in bits of colored construction paper or even add little pieces of flowers, leaves, glitter, or small threads. This time we just wanted plain paper as a blank canvas with a tad more interest than ordinary paper.

Step 2: Place in blender, filled 3/4 full with water, then pulverize!

Step 3: Pour the slurry onto a 2-part frame. Tim made ours years ago by building two simple frames with an outer dimension of 7x9" and an inner opening (the size the finished paper will be) of about 5x7".Then on one of the frames, he fastened a sheet of window screen the same size as the frame. The piece without the screen is called a deckle. Your frames can be any size, but you will need to have a tub large enough to contain them, so our small size works pretty well.
Place the frames together with the screen side sandwiched in the middle. Pour pulp onto screen which sits in a tub to catch the overflow and excess water. Another technique is to fill the tub with the slurry and dip the frames into the slurry. The pouring version results in less waste, however.
After covering the screen, shake slurry to distribute well. Make sure you have no holes.

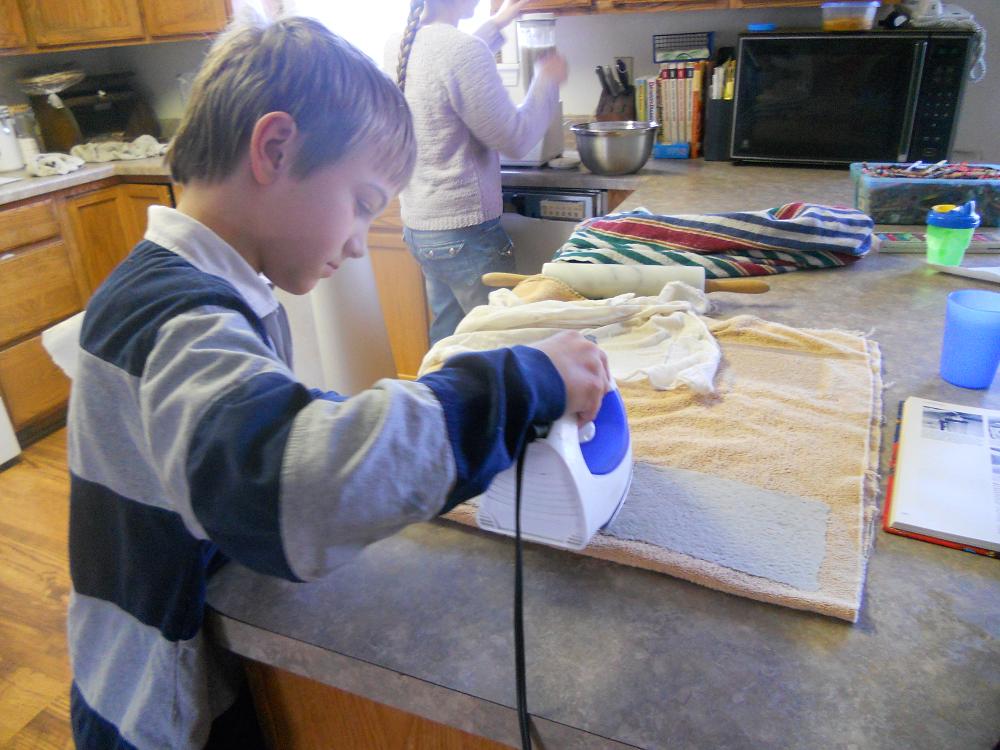
Step 4: Holding both parts of the frame together, lift out of tub and allow water to drain. Remove the deckle, and then cover your paper with a piece of large white felt, cheesecloth, or other large piece of fabric. Flip frame/screen, paper, and fabric onto a towel. Before removing screen, press excess water out of paper and soak up with another towel or rag. Carefully remove frame. Iron paper to help dry. You don't have to iron to complete dryness, as paper will air-dry within a day or so.

For further instructions, check out this website.
Paper making from recycled paper is quite simple, and handmade paper makes a nice vehicle for pressed flowers, cards, or other artwork. It can be as simple or fancy as you wish.
Step 1: Tear up newsprint into little pieces. We have an end roll from a newspaper printer, and it comes in handy for all sorts of projects! You can also recycle other types of paper, but newsprint easily makes a pulp, unlike some firmer types of paper. If you want colored flecks, you can throw in bits of colored construction paper or even add little pieces of flowers, leaves, glitter, or small threads. This time we just wanted plain paper as a blank canvas with a tad more interest than ordinary paper.

Step 2: Place in blender, filled 3/4 full with water, then pulverize!

Step 3: Pour the slurry onto a 2-part frame. Tim made ours years ago by building two simple frames with an outer dimension of 7x9" and an inner opening (the size the finished paper will be) of about 5x7".Then on one of the frames, he fastened a sheet of window screen the same size as the frame. The piece without the screen is called a deckle. Your frames can be any size, but you will need to have a tub large enough to contain them, so our small size works pretty well.
Place the frames together with the screen side sandwiched in the middle. Pour pulp onto screen which sits in a tub to catch the overflow and excess water. Another technique is to fill the tub with the slurry and dip the frames into the slurry. The pouring version results in less waste, however.
After covering the screen, shake slurry to distribute well. Make sure you have no holes.

Step 4: Holding both parts of the frame together, lift out of tub and allow water to drain. Remove the deckle, and then cover your paper with a piece of large white felt, cheesecloth, or other large piece of fabric. Flip frame/screen, paper, and fabric onto a towel. Before removing screen, press excess water out of paper and soak up with another towel or rag. Carefully remove frame. Iron paper to help dry. You don't have to iron to complete dryness, as paper will air-dry within a day or so.
Step 5: You don't have to iron to complete dryness, as paper will air-dry within a day or so.
Step 6: Decorate! Most of our paper still awaits ink in a future art assignment, but Amanda made a quick test sketch on one of the reject pieces of paper. (We wondered if the ink would absorb too rapidly. Some recipes suggest adding starch as sizing to help with this, but we think the paper works decently even without starch.)
 |
| (Drawing is taped onto an antique school slate from the 1840s.) |

Comments